Web Components Demo: Templates and (some) Shadow DOM

Author’s Note: it’s best to review this code in Google Chrome 36+. Also, open up the Dev Tools and under “General” and then “Settings,” make sure that the “Show user agent shadow DOM” box is checked.
I spent some time hacking Web Components during a long flight layover and it was time well spent. I put together a small demo, just so I could better understand Web Components as a whole.
Web Components is a concept composed of four sub-concepts, but I just focused on two of them for the demo: templates and Shadow DOM…primarily templates. At the time of this post, implementing Web Components neatly across the different browsers and devices requires a polyfill library like Polymer or X-Tag, but I wanted to study the internal workings of each sub-concept before diving into the polyfills.
A quick Web Components description
Web Components are a set of emerging technologies working their way towards a firm specification, thanks to the hard work of the W3C. The goal of Web Components is to allow developers to create custom elements with HTML, CSS and JavaScript…these elements can also be thought of as widgets.
An great example of this is the <github-card> custom element. If you have a GitHub account, check out the <github-card> demo page, add your GH username in the field to review the end result, then go to the <github-card> documentation to download the code and see how to apply it to your page using a simple tag.
The four sub-concepts that make up Web Components are:
- Templates: a chunk of formatted HTML that can be cloned, inserted and rendered based on instructions you give it. Read more »
- Shadow DOM: an encapsulated separate DOM that you can add code to. It’s best to think of it as “a DOM within your DOM.” Read more »
- Custom Elements: the ability to create custom page tags, such as
<github-card>. Read more » - HTML Imports: the ability to load in small pieces of HTML code into your page when needed via
<link>tags. Read more»
(all the above “Read more »” links courtesy of HTML5 Rocks):
While things like <github-card> utilize all the sub-concepts, each one can function on its own quite nicely. But when they all work together, they form Web Components…conceptually, it’s best to think of WC in the same way as AJAX, where a group of technologies work together to perform a single task.
(Side note: there’s another sub-concept called “decorators” but lots of developers don’t like it, so there’s not a lot of focus in terms of finalizing its specification. It may disappear.)
Started out by focusing on templates…mostly
I’ve read about all of these sub-concepts (including decorators) but played with the actual code just a little, and the best way to learn is by doing instead of reading. So I’m in the middle of hacking out code for each sub-concept, starting with templates.
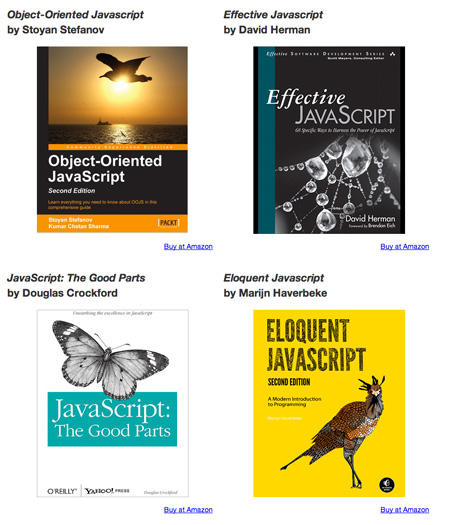
For the templates, I wanted to display a simple list of books based on a small JavaScript data object. Things started out like this…
index.html
<!DOCTYPE html>
<html lang="en">
<head>
  <meta charset="UTF-8">
  <meta name="viewport" content="width=device-width, initial-scale=1">
  <title>JavaScript Books</title>
  <link rel="stylesheet" href="css/normalize.min.css">
  <link rel="stylesheet" href="css/bootstrap.min.css">
  <link rel="stylesheet" href="css/styles.css">
</head>
<body>
  <div id="container">
    <header>
      <h1 class="page-header">JavaScript Books</h1>
      <h2>Built with templates & Shadow DOM</h1>
    </header>
    <template id="singleBook">
      <style>
        .templateArticle {
          display: inline-block;
          margin: 6px;
        }
        .btn {
          margin: 10px;
          float: right;
        }
        .thumbnail {
          margin-bottom: 0;
        }
        .bookTitleClass {
          text-align: left;
        }
        #bookTitle {
          font-style: italic;
        }
      </style>
      <article class="templateArticle panel panel-default">
        <header class="panel-heading">
          <h2 class="panel-title bookTitleClass">
            <span id="bookTitle"></span>
            <br />
            by <span id="bookAuthor"></span>
          </h2>
        </header>
        <img src="" alt="" class="thumbnail">
        <a href="" id="btnPurchase" class="btn btn-primary" role="button" target="blank">Buy at Amazon</a>
      </article>
    </template>
    <section id="allBooks" class="allBooksClass"></section>
    <script src="scripts/main.js"></script>
  </div>
</body>
</html>
css/styles.css
body {
  margin: 20px;
}
h1, h2 {
  text-align: center;
}
footer {
  text-align: center;
  margin-top: 20px;
}
.allBooksClass {
  margin-top: 30px;
  text-align: center;
}
scripts/main.js
(function(){

  var jsBooks = {
    "book1" : {
      "title": "Object-Oriented Javascript",
      "author": "Stoyan Stefanov",
      "image": "images/ooj.jpg",
      "amazonLink": "http://amzn.to/1sRFbEC"
    },
    "book2" : {
      "title": "Effective Javascript",
      "author": "David Herman",
      "image": "images/effectivejs.jpg",
      "amazonLink": "http://amzn.to/1pLu1A5"
    },
    "book3" : {
      "title": "JavaScript: The Good Parts",
      "author": "Douglas Crockford",
      "image": "images/goodparts.jpg",
      "amazonLink": "http://amzn.to/1ukjoIN"
    },
    "book4" : {
      "title": "Eloquent Javascript",
      "author": "Marijn Haverbeke",
      "image": "images/eloquentjavascript.jpg",
      "amazonLink": "http://amzn.to/1lPP6pn"
    }
  };

  var template = document.querySelector("#singleBook"),
    templateContent = template.content,
    host = document.querySelector("#allBooks"),
    root = host.createShadowRoot();

  for (key in jsBooks) {
    var title = jsBooks[key].title,
      author = jsBooks[key].author,
      image = jsBooks[key].image,
      amazonLink = jsBooks[key].amazonLink;

    templateContent.querySelector("img").src = image;
    templateContent.querySelector("img").alt
    = templateContent.querySelector("#bookTitle").innerHTML
    = title;
    templateContent.querySelector("#bookAuthor").innerHTML = author;
    templateContent.querySelector("#btnPurchase").href = amazonLink;
    root.appendChild(document.importNode(templateContent, true));
  }
})();
index.html contains both normalize.css and the main Twitter Bootstrap CSS file. Bootstrap is providing responsive functionality, but is mostly here to make parts of the site look pretty. styles.css adds extra styling to some page elements and has a very small role in the project.
Past that, there’s some basic HTML but there’s also the Web Component-centric template tag that has an ID of singleBook. The code inside of </code> contains HTML and some CSS in a
The template contains an <article> tag: this is where the book data in the JS object will be parsed as content. The template tag is also inert, meaning it’s not visible on page load and can’t communicate with any outside code until we say so.
Note that some parts of <article> are empty:
- the two
<span>tags. - the
srcandaltattributes for the only<img>tag. - the
hrefattribute for the only<a>tag.
This empty parts will be populated with our object data…let’s look at that…
(function(){
...
})();
Everything’s wrapped in an IIFE.
var jsBooks = {
  "book1" : {
    "title": "Object-Oriented Javascript",
    "author": "Stoyan Stefanov",
    "image": "images/ooj.jpg",
    "amazonLink": "http://amzn.to/1sRFbEC"
  },
...
};
The JavaScript data object. There’s only one item one listed here but it contains four items altogether, each about a particular JavaScript book. Each item has a title, author, image and amazonLink property.
var template = document.querySelector("#singleBook"),
  templateContent = template.content,
  host = document.querySelector("#allBooks"),
  root = host.createShadowRoot();
Starting to create the Shadow DOM. I’m creating a single var pattern to define four variables…
templateis a direct reference to the template, which has an ID ofsingleBook.templateContentis a direct reference to value of the template’scontentattribute at the time of page-load…the page tags, their attributes. Everything. Read more over on MDN.hostis a direct reference to what’s known as the “shadow host” and it’s the page element where template content gets load into. That’s the<section id="allBooks">page element in this case. This is commonly referred to as the “shadow host” and it can have any variable name you want, but it’s convention to name it “host.”rootis a direct reference to what’s known as the “shadow root” and it’s referring to the content that that gets generated INSIDE the template. Thanks to thehost.createShadowRoot()line, I’m placing this content inside ofhost, which, again, is the<section id="allBooks">element…it may be easier to think of it as the actual Shadow DOM. When the content has fully loaded into the root, it gets returned to the web page as a document fragment…read more about document fragments It also can also have any variable name you want to give it, but it’s convention to name it “root.”
for (key in jsBooks) {
...
};
A for…in loop will populate the template with the content in the “jsBooks” object. That code needs to be broken down…
var title = jsBooks[key].title,
  author = jsBooks[key].author,
  image = jsBooks[key].image,
  amazonLink = jsBooks[key].amazonLink;
Assign simple variable references to all the single item properties in the jsBooks object.
templateContent.querySelector("img").src = image;
Look for the <img> tag in the template and populate its src attribute with whatever the value is of the “image” property at the time of the loop.
templateContent.querySelector("img").alt
  = templateContent.querySelector("#bookTitle").innerHTML
  = title;
Look for the <img> tag in the template and populate its alt attribute with whatever the value is of the “title” property at the time of the loop.
At the same time, look for the #bookTitle element in the template (one of the <span> tags) and populate it with whatever the value is of the “title” property is at the time of the loop.
templateContent.querySelector("#bookAuthor").innerHTML = author;
Look for the #bookAuthor element in the template (the other <span> tag) and populate it with whatever the value is of the “author” property at the time of the loop.
templateContent.querySelector("#btnPurchase").href = amazonLink;
Look for the #btnPurchase element in the template (the only a tag) and populate its “href” attribute with whatever the value is of the current amazonLink property at the time of the loop.
root.appendChild(document.importNode(templateContent, true));
Okay, we need to spend some time talking about this line of code…
At this point in the code, all my object data has populated the template and is represented by the templateContent variable. But this is what was returned as a document fragment.
The document fragment isn’t part of the page DOM and, in this case, needs to be treated as an external document. The document.importNode() method can duplicate content from external documents, and by passing the true parameter, we’re doing a deep copy of the content and copying everything inside of it.
From there, we’re treating the root as a parent element and appending (i.e., “adding”) a child inside of it. The child we’re adding is the template content we just brought over with document.importNode().
(Side note: document.importNode() is cool…read more about it over on MDN).
And if we review index.html in Chrome 36 or higher with the “Show user agent shadow DOM” box checked, it should look (almost) like the demo. And if we then do an “Inspect Element” check and look in the <section> tag (which is the shadow host), you’ll see the template content (which is the shadow root).

But there’s a problem: Bootstrap styles that are applied to certain elements inside of <template> are being ignored. Anything class names containing the word panel or btn should have well-recognized Bootstrap styles, especially the buttons…
This is happening because, as mentioned above, the code inside the template can’t communicate with any outside code and, technically speaking, <template> is in the Shadow DOM, which is naturally-encapsulated. So none of the page’s three stylesheets (normalize.min.css, bootstrap.min.css and styles.css) can affect the template’s layout. And for now, adding stylesheets to the Shadow DOM with <link> isn’t allowed.
Import the styles
styles.css doesn’t need to interact with the layout but the other two have to. The solution is to use @import inside the template’s <style> tag to bring both of them in:
<style>
  @import url("css/normalize.min.css");
  @import url("css/bootstrap.min.css");
...
</style>
Using @import is frowned upon from a performance standpoint, but it’s how this particular problem gets solved. And as Google’s Rob Dodson points out in his excellent Web Components article, using Polymer avoids doing this by bringing in the stylesheets with XHR requests.
But there’s another problem: by doing deep clones of template content at each loop iteration, the style tag is getting added four times when it really only needs to be added once.
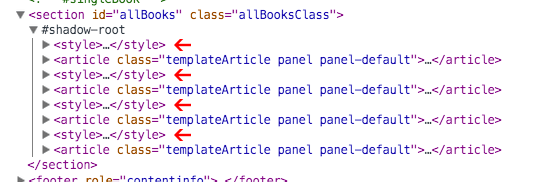
Adjust the loop
This can be fixed by changing the loop procedure: every time the loop runs, deep-copy just the article tag by referring to its “templateArticle” class, then append it to the section tag. Leave the loop after it’s ended, then append the style tag to section, which is the shadow host.
This requires changing the end of the JavaScript from this…
(function(){
...
    root.appendChild(document.importNode(templateContent, true));
  }
})();
…to this
(function(){
...
    root.appendChild(document.importNode(templateContent.querySelector(".templateArticle"), true));
  }
  root.appendChild(document.importNode(templateContent.querySelector("style"), true));
})();
And now there’s only one style tag inside the shadow root and it’s properly applying the styles.
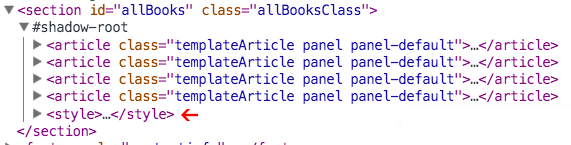
Because <style> gets added to <section> with appendChild(), it gets placed at the bottom. Were this live production code, I would (probably) use something like jQuery.prepend() to place it at the top.
But placing it at the bottom doesn’t affect my goals for this project, which was to learn how templates and Shadow DOM work. Still, read more about jQuery.prepend() here.
Further reading
There are links above to a Rob Dodson article and a group of links to various articles over on HTML5 Rocks. The Dodson article provides a great high-level view of Web Components so if you’re at the early stages of discovering them, I would read that one first…the HTML5 Rocks articles next.
The W3C has an older article called Introduction to Web Components. It’s a working draft and is over a year old based on this post’s publish date but is still another high-level view that’s slightly more technical….read it while keeping in mind it’s old and hasn’t been updated in a while.
Truthfully, the W3C has been referring people to the Web Components Wiki lately so you should review that. It points to the HTML5 Rocks links and the specs for Shadow DOM, Custom Elements and HTML Imports. The WHATWG has the proper version of the Template spec.
Specs may be verbose to read at times, but it’s always a good idea to read them.
Most profoundly, Microsoft has made no firm decision on what Web Component features Internet Explorer will and will not support at the time of this post’s publish date. I’m assuming that will change in the future though…read more on the modern.ie status page.
Pointing out the IE issues makes a nice segue to polyfills…take note that Polymer is the most popular Web Component polyfill for now, but only supports IE 10 and up. Read more on Polymer’s Browser Compatibility page.
X-Tag isn’t as feature-rich as Polymer but supports a wider array of browsers, including IE 9 and up. Read more on X-Tag’s Docs page.
Conclusion
Using something like Polymer or X-Tag is what’s needed to use Web Components in production-level code right now, but these libraries work ON TOP of Web Components. So it’s best to learn the underlying code first.
I can’t say that my code is perfect, but I achieved the goal I set for myself and was able to solve any problems I faced by actually writing the code instead of just reading about it. I have a much better handle in templates and Shadow DOM then I did before, and that’s enough.