The “Head First” Duck Simulator In Typescript
TypeScript is a superset language of JavaScript. It gives JavaScript tools for building and organizing large scale web applications…tools that already exist in languages like C# and Java.
TypeScript makes it easier to apply classic software design patterns to JavaScript, so I looked at one of those patterns, the strategy pattern, and did just that. The classic Head First Design Patterns book provided me with a project where I could do this.
Table of Contents
- Assumptions & Notes
- What Is TypeScript?
- Why Should You Use TypeScript?
- What Are “Design Patterns”?
- The Duck Simulator Problem
- Applying The Strategy Pattern To The Duck Simulator
- Start Looking At The Code
- The Interfaces
- The Core
DuckClass - The Subclasses
- The Constructor Functions
- Other Resources
- Conclusion
Assumptions & Notes
Some assumptions…
- I'm assuming you have a little-better-than-basic understanding of JavaScript…variables, objects, functions and arrays shouldn't confuse you. I'll mention prototypes but won't cover them in depth. If you don't fully understand those, MDN's Details of the object model does a great job of explaining them. There is some debate about the accuracy of that post, but it's accurate enough for understanding the context of what I did here.
- I'm assuming you either have Node installed or know how to install it. I'm also assuming you can run its related commands from a terminal.
Some notes…
- I have to point to Márk Török's excellent TypeScript design patterns repo as an excellent resource for helping me do all this. Honestly? If all you want to know is how to apply TypeScript to traditional software design patterns, you may just want to go to that repo.
- I'm new to TypeScript at the time of the post and, past the basics, only researched the parts needed to complete this project. The “Handbook” listed in the TypeScript documentation is a more comprehensive learning resource.
What Is TypeScript?
TypeScript is a language created by Microsoft that takes tools already in languages like C# and Java and brings them into JavaScript. These things include strong-typing, interface-powered classes, access modifiers, generics and more direct access to a function's constructor property.
(Note: for the rest of this post, I'll be referring to TypeScript as “TS” quite often.)
Using these things is optional, keeping JavaScript's flexible nature intact. You can also use ES6 in your TS code and compile it down to ES5 or ES3 with tools like Grunt and Gulp, or at the command-line level…like I'll be doing in this post.
Why Should You Use TypeScript?
The main reason for using TypeScript is that it brings a strong level of organization to your codebase…especially if it's a BIG codebase. Classes, interfaces and the like reduce the amount of “spaghetti code” in your JavaScript, making it more manageable as well as more readable to other developers.
Another reason is if you're concerned about the changes that came to Angular with the release of AngularJS2. That language was written in TypeScript so knowing TS will make learning AngularJS2 easier.
(Note: not only did Ray Villalobos from lynda.com write a great article on the TS/AngularJS2 connection, but he also released the Learn AngularJS 2: The Basics course on lynda.com two days before this post's publish date. I've gone through about half of it at the time of this blog post and really like it.)
Also, TypeScript syntax is incredibly similar to that of C# and Java. So learning TS gets you started with learning those languages as well…along with many others.
Lastly, TypeScript's syntax makes easier to implement traditional design patterns in JavaScript.
What Are “Design Patterns”?
Design patterns are coding implementations that solve a specific problem in software development. They were codified in 1994's Design Patterns book, sometimes referred to as the “Gang of Four book” in reference to its having four authors.
Generally speaking, Design Patterns walks through each pattern by saying:
- this is a particular software problem.
- this is the proven design pattern to use to solve that problem.
- this is what the pattern's code looks like.
- these are the pros and cons of using that pattern.
Head First Design Patterns is a book influenced by Design Patterns that came out ten years later. It doesn't cover all the patterns in the Gang of Four book, but it covers the most popular ones and is easier to read.
(Note: Addy Osmani from Google has written a free e-book of pure JavaScript implementations of some of these patterns.)
Head First starts off with a discussion of the strategy pattern and uses it to solve a problem with some duck simulator software.
The Duck Simulator Problem
Here's a slimmed-down description of the problem:
There's a developer that maintains a game called “SimUDuck,” which simulates different types of ducks in a pond. The ducks already have the ability to quack, swim and display what type of ducks they are.
At the software level, all those behaviors are stored in a Duck class as methods, respectively named quack(), swim() and display(). There are also duck subclasses (like the ones for Mallard and Redhead ducks) that inherit these methods directly from Duck.
The developer is told to programmatically make ducks fly and does so by adding an internal fly() method to Duck. Then problems arise.
Both decoy and rubber ducks are added to the game and they fly…ducks like that don't fly!!! And it turns out that the new ducks quack differently from the other ducks.
So this is what the developer has to deal with:
- the
Duckclass has afly(),quack(),swim()anddisplay()method. - any subclass that inherits from
Duckwill also inherit those methods and their behaviors. - some ducks cannot fly.
- all ducks quack, but not in the same way.
- all ducks can swim in one way or another and use the exact same method to let everyone know this.
- all ducks use the same
display()method to give information about what kind of duck they are, but the information is different across all the ducks.
The big problem, is with the fly() and quack() methods inside the Duck class because, as we learned from the decoy and rubber ducks, inheriting subclasses use those two methods differently. For the inheriting classes, the developer could give each one its own fly() and quack() methods, which would override the ones in Duck.
But that would duplicate the code throughout the codebase, violating the DRY principle. So the developer needs to find a way to let those inheriting ducks use the fly() and quack() methods already inside the Duck class while remembering that each duck will fly and quack differently.
Enter the strategy pattern.
Applying The Strategy Pattern To The Duck Simulator
Using the strategy pattern means a method's behavior is selected at runtime. For example: a subclass can inherit the quack() method from the core Duck class, but it's the subclass that decides how it quacks…maybe it squeaks…maybe it makes no sound at all.The subclass decides the method's behavior, not the core class.
This is done by NOT placing the methods directly in a class and, instead, listing them in a separate class-like container called an interface. Classes can grab those methods by attaching themselves to the interface later on.
By placing the varying behavior methods in interfaces instead of classes, and then letting the classes grab those methods in a separate process, we're following one of the core design principles in object-oriented programming:
“Encapsulate what varies”
Conditional checking is where you see lots of varying code in JavaScript, so that's the best JS use-case for the strategy pattern. If you're only checking for two conditions then you can probably stick with an if/else statement or a ternary check, but if you have more than that or have a long switch/case statement, consider the strategy pattern.
(Note: Los Techies has a great JavaScript strategy pattern example.)
But with Java, Head First solved the SimUDuck problem by:
- placing the flying and quacking behaviors into their own interfaces,
- having the
Duckclass implement the interfaces, - placing the
swim()method inDuckand have it work the same across all subclasses, - and adding a
display()method toDuckin a way that subclasses had to have one, but could choose its behavior.
Head First also provided a class diagram visual of what this looked like:
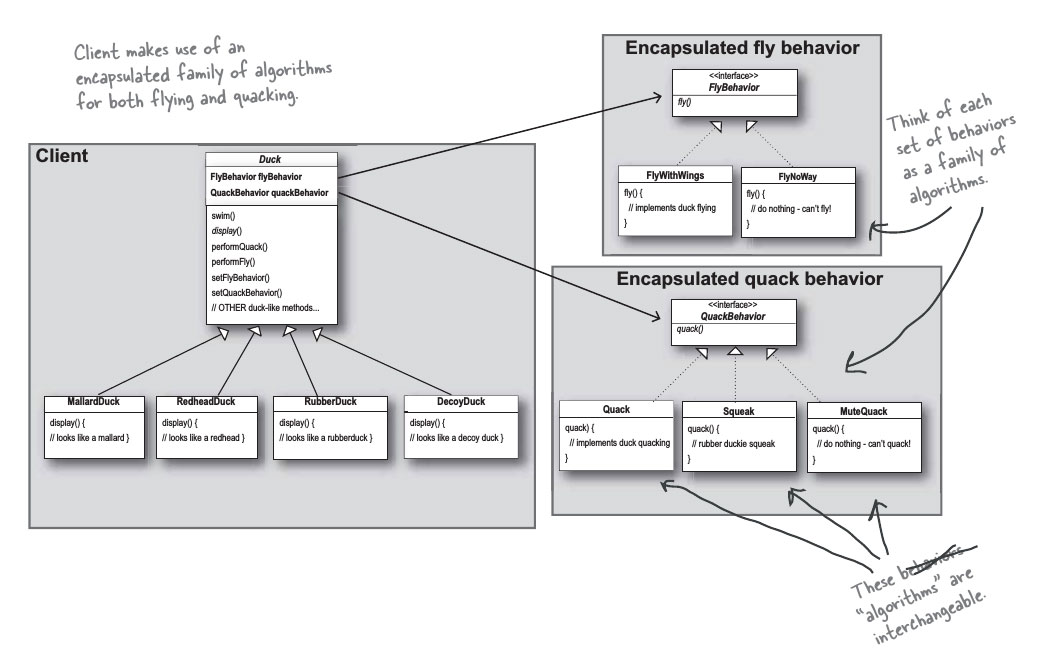
We'll recreate all this with TS.
(Note: the “Head First” book creates “getter” and “setter” methods to build a “rocket-powered” duck subclass…no kidding !!! While getters and setters are important in programming, I chose not to do this here because I felt I was going too much against JavaScript's flexibility. Maybe I'll add it in the future.)
Start Looking At The Code
We'll create a bunch of TypeScript .ts files and then use the command line to compile them down to a file called main.js. So we need a certain file structure:
├── typescript-source-files
|   └── classes
|       ├── Duck.ts
|       └── subclasses
|           ├── Decoy.ts
|           ├── Mallard.ts
|           ├── Redhead.ts
|           └── Rubber.ts
|   └── interfaces
|       ├── Fly.ts
|       └── Quack.ts
|   └── main.ts
├── index.html
└── main.js
Then we need to globally install TypeScript with Node/npm:
npm install -g typescript
Then we go to the command line, navigate to this project folder and type:
tsc --out main.js typescript-source-files/main.ts -w
This will watch for changes to any of the .ts files in the typescript-source-files folder as well as alert us of code errors…very helpful! If our TS code saves without errors, main.ts in that directory will build out a file to the root called main.js.
The HTML is pretty basic. We're just going to return console statements instead of change the DOM, so main.js will be the only file we'll work with.
<!-- index.html -->

<!DOCTYPE html>
<html lang="en">
<head>
    <meta charset="UTF-8">
    <title>TypeScript Duck Simulator</title>
</head>
<body>
    <script src="main.js"></script>
</body>
</html>
The Interfaces
As mentioned, Head First placed the flying and quacking behaviors in their own interfaces. We'll do that, starting with the flying interface:
/* Fly.ts */

module Fly {

  export interface FlyBehavior {
    fly(): void;
  }

  export class FlyWithWings implements FlyBehavior {
    public fly(): void {
      return console.log( "I'm flying!!" );
    }
  }

  export class NoFly implements FlyBehavior {
    public fly(): void {
      return console.log( "I can't fly!!" );
    }
  }
}
Breaking down the code…
We want to let other files treat Fly.ts file as a dependency that they can import…like ES6 import and Node require() statements do already. So we wrap everything in a TypeScript module object.
Then we create an interface object with the interface keyword and call it FlyBehavior. It contains a reference to a method called fly().
We'll need other classes to access the interface so we put an export statement before it. fly() doesn't return a specific type like a number or a string, so we return it as a void type.
(Note: returning a type is one of those optional things in TS and doesn't have to be done here. But doing it is a best practice.)
It's key to understand that, while fly() exists at this point in our code, it isn't actually doing. Which is what we want.
Remember that some ducks fly and some don't, so we want to let the duck subclasses use fly() to run whatever specific flying behavior they have. Setting up the fly() method like this ensures that the subclasses can do just that.
The different behaviors are listed in the FlyWithWings and NoFly classes. Each one returns a console statement on whether the duck can or cannot fly.
Like the interface, each one uses exports so it's available to other classes. Each one also uses implements to attach itself to FlyBehavior.
When a class implements an interface like this, it's as if the class is signing a contract. The class is formally agreeing to use methods and properties defined in the interface.
(Note: if a class implements an interface in TypeScript, the class HAS to use the properties and methods listed inside it or the TS build will fail. But you can define some of those properties and methods as optional to use.)
The quack behavior file is set up just like the fly behavior one. Except the module name is Quack, the interface name is QuackBehavior and the behavior classes are called Quack, Squeak and MuteQuack.
/* Quack.ts */

module Quack {

  export interface QuackBehavior {
    quack(): void;
  }

  export class Quack implements QuackBehavior {
    public quack(): void {
      return console.log( "I'm quacking!!" );
    }
  }

  export class Squeak implements QuackBehavior {
    public quack(): void {
      return console.log( "I'm squeaking!!" );
    }
  }

  export class MuteQuack implements QuackBehavior {
    public quack(): void {
      return console.log( "I don't quack!!" );
    }
  }
}
Again, all this set-up means that the subclasses we'll create later on can set up their own behaviors and not depend the core class to it. This follows another design pattern rule:
“Program to an interface, not an implementation”
(Note: when writing with any code that deals with inheritance, TypeScript usually converts to code that makes extensive use of prototypes. I'm going to push you to regularly copy and paste TS code into the left-hand side of the TypeScript Playground and see how this happens…and when this happens.)
The Core Duck Class
The core Duck class looks like this:
/* Duck.ts */

/// <reference path="../interfaces/Fly.ts" />
/// <reference path="../interfaces/Quack.ts" />

abstract class Duck {

  private flybehavior: Fly.FlyBehavior;
  private quackbehavior: Quack.QuackBehavior;

  public performFly(): void {
    this.flybehavior.fly();
  }

  public performQuack(): void {
    this.quackbehavior.quack();
  }

  public swim(): void {
    return console.log( "I can either swim or float!!!" );
  }

  abstract display(): void;

  constructor( flybehavior: Fly.FlyBehavior, quackbehavior: Quack.QuackBehavior, public name: string = "Anonymous Duck" ) {
    this.flybehavior = flybehavior;
    this.quackbehavior = quackbehavior;
  }

}
Breaking this code down…
We're giving the Duck class access to both interfaces by declaring them as dependencies at the top with a reference path. Then we're defining this class as abstract with the abstract keyword.
An abstract class is a class that can't be instantiated, meaning we will never create an instance of this class with new Duck(). That's fine: we're building this class so subclasses can inherit from it…they'll do the instantiating.
Next, we create flybehavior and quackbehavior variables as references to our interface behaviors. Variables defined in a class are called instance variables.
Note that each variable has private before it, so no code outside this class can access them. Also note that each variable value is namespaced against our interface references: it's Fly.FlyBehavior instead of FlyBehavior.
And now we start to see the power our interfaces give us with the performFly() and performQuack() methods. Those methods hook into the instance variable references of our interface, which hooks into the respective fly() and quack() methods in those interfaces.
When we create a constructor functions for the various ducks, we can pick one of the interface behaviors we created – like Fly or Squeak – and run it with performFly() and performQuack(). But swim() is already configured inside Duck to do the same thing for all the ducks.
Then there's the abstract display(): void; line: this is the method that displays the duck type…Rubber, Mallard, etc. By declaring it abstract, this means the subclasses must have this method.
Finally, we set up the class' constructor property, which defines the properties and structure of our duck constructor function. Constructors are ~usually~ listed at the top of the class, but I put it at the bottom as I thought it would make it easier to explain all this.
constructor lists the parameters we need to define when creating a new instance of the class with a constructor function. These include both the flying and quacking behaviors.
The other parameter is name, which we're giving a value of “Anonymous.” This means that adding this parameter to a constructor function is optional…it will equal “Anonymous” if left off.
The Subclasses
With the Duck class built, we can create the four subclasses…Decoy, Mallard, Redhead andRubber:
/* Decoy.ts */

/// <reference path="../Duck.ts" />

class Decoy extends Duck {

  public display(): void {

    return console.log("My name is " + this.name +  ". I am a Decoy Duck!!!" );

  }

}
/* Mallard.ts */

/// <reference path="../Duck.ts" />

class Mallard extends Duck {

  public display(): void {

    return console.log("My name is " + this.name +  ". I am a Mallard Duck!!!" );

  }

}
/* Redhead.ts */

/// <reference path="../Duck.ts" />

class Redhead extends Duck {

  public display(): void {

    return console.log("My name is " + this.name +  ". I am a Redhead Duck!!!" );

  }

}
/* Rubber.ts */

/// <reference path="../Duck.ts" />

class Rubber extends Duck {

  public display(): void {

    return console.log("My name is " + this.name +  ". I am a Rubber Duck!!!" );

  }

}
These subclasses have a few things in common:
- each one references the
Duck.tsfile as a dependency so it can access theDuckclass. - each one uses the
extendskeyword to inherit everything insideDuck. - each one uses the
display()method insideDuck.
The only real difference is in the console message each subclass returns when display() runs. Along with the type of duck it is, that message also returns the name of the duck which the subclass has access to via the public name property in the Duck class' constructor.
(Note # 1: I suppose this could go in an interface but you can see how abstract methods work.)
(Note # 2: when using extends to trigger class inheritance, TypeScript does code injection at the top of your outputted .js file. The injected code is similar to the top answer of this Stack Overflow question at the time of this post, which is similar to how developers have been mimicking extends functionality for years. To see how it works, cut and paste one of these subclass code blocks into the TS Playground.)
The Constructor Functions
Finally, we get to use all this code by creating some new constructor functions:
/* Main.ts */

/// <reference path="classes/subclasses/Decoy.ts" />
/// <reference path="classes/subclasses/Mallard.ts" />
/// <reference path="classes/subclasses/Redhead.ts" />
/// <reference path="classes/subclasses/Rubber.ts" />

let joey = new Decoy( new Fly.NoFly(), new Quack.MuteQuack(), "Joey" );
joey.display();
joey.performFly();
joey.performQuack();
joey.swim();
console.log("\n\n");

// Create an instance of a "Mallard"
let tina = new Mallard( new Fly.FlyWithWings(), new Quack.Quack(), "Tina" );

tina.display();
tina.performFly();
tina.performQuack();
tina.swim();
console.log("\n\n");

// Create an instance of a "Redhead"
let noName = new Redhead( new Fly.FlyWithWings(), new Quack.MuteQuack() );

noName.display();
noName.performFly();
noName.performQuack();
noName.swim();
console.log("\n\n");

let rick = new Rubber( new Fly.NoFly(), new Quack.Squeak(), "Rick" );
rick.display();
rick.performFly();
rick.performQuack();
rick.swim();
First, we use reference to bring in all our subclass files as dependencies, Next, we use the ES6 let keyword (instead of var) to create one constructor function for each subclass and pass the flying and quacking behaviors as parameters.
For example: we create a new instance of Decoy called joey and we pass our two behavior parameters. We make joey NOT fly with new Fly.NoFly() and NOT quack with new Quack.MuteQuack().
From there we create three other instances for the three other subclasses in the same way…either making them fly or not, or quack in a certain way or not. The only real difference is the noName instance of the Redhead subclass…we didn't pass it a name parameter so this instance will take in the default “Anonymous” name we gave it in the Duck class.
Other Resources
I've listed many learning resources throughout this post. Here's a list that includes some of those and a few others:
- the TypeScript documentation: especially the “Quick start” and “Handbook” pages. This is probably your first stop.
- Anders Hejlsberg: Introducing TypeScript: a screencast from the guy that created Typescript…and C#. This screencast is a little over two-and-a-half years old at the time of this post so some things he talks about may be updated. But it's still informative and still worth a watch.
- Design Patterns in TypeScript: I can't stress enough how help this GitHub repo was/is.
- TypeScript In-depth course on Pluralsight: I haven't seen this course created by Brice Wilson, but have seen many positive things said about it so it's worth a watch.
- Introduction to TypeScript course on edX (not out yet): not out at the time of this post, but it's co-taught by Anders Hejlsberg, so it's worth a look when released.
- Visual Studio Code: an editor built with Electron, making it similar to Sublime Text and very very VERY similar to Atom. It's still new and has a few bugs so you probably don't want to abandon your current editor for it, but it's got lots built-in debugging tools based around TypeScript. Using it will help you learn TypeScript faster.
- the Typings definitions manager: TypeScript regularly uses definition files to describe the structure of an external JS library. Typings is a CLI tool that lets you install and search for definitions. All this can be tough to grasp in the beginning: the Definitions documentation on CodePlex describes it well.
Conclusion
I'm still new to TS and there's tons of things I didn't discuss. To name a few: I didn't discuss type inference, the new enum type, the built-in JSX functionality, Generics or the aforementioned definition files.
Furthermore, I haven't figured out how to integrate TypeScript builds into a CommonJS build process using something like Browserify or webpack. That seems to be tough as I've seen more situations where people go the AMD route instead…this is something I'm still grasping.
But while using it doesn't fit every use-case, I'm happy that I took the time to apply TypeScript to the strategy pattern to add organization to a somewhat complex codebase. I wrapped my head around some complex subjects by doing this, so I encourage you to give the TS documentation a look, fire up an editor like VS Code and doing the same.
<em(note: returning console is great for understanding concepts, but a real-world use case that builds things on a web page is better. that's coming in a ~relatively~ soon, upcoming post.)< em>