New Site I Worked On: RevlonProBrands.com

Revlon, my employer, recently launched RevlonProBrands.com, a one-page site that acts as a sales tool for the company’s sales reps. It was designed by a Colorado web shop and passed on to Revlon’s internal web team for integration into a Sitecore environment.
There wasn’t a need for lots complicated client-side code, but working on this project gave me the chance to use certain web development tools and code techniques. Let’s discuss them:
Table of Contents
GitHub Atom
Sublime Text was my primary development environment for this project, but there were a few instances when I switched to Atom. Which is a web editor that GitHub released to beta a few months ago from this blog post.
Atom definitely “takes inspiration” from Sublime Text in terms custom configuration…many features that needed to be installed in Sublime as third-party packages are native in Atom.
This includes Git and GitHub integration, which is obvious when you consider Atom’s creator. If your project is already Git-configured (i.e., if you’ve already done a full git init inside of it and it’s been pushed up to GitHub at least once), the configs can communicate with Atom and perform lots of Git-related tasks.
Here are a few of the tasks…
- Atom can read a project’s
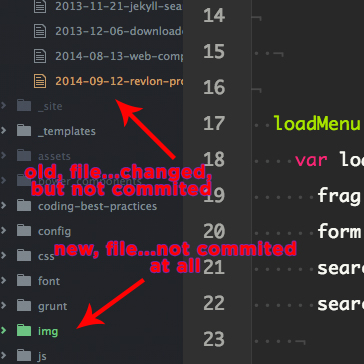
.gitignorefile and tell you which files are ignored by greying them out in your project tree.
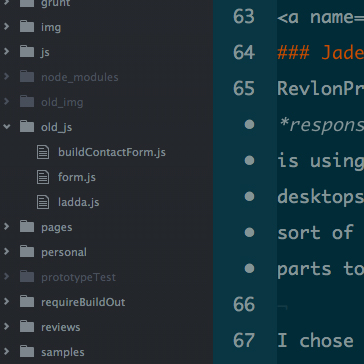
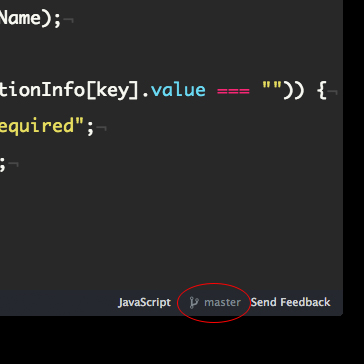
- Atom tells you what branch you’re currently working on.
- Atom uses color-coding to indicate that files need to be commited to your git repo.
This is not to say that Sublime can’t do any of these things, because it can. It’s just that these features come pre-installed into Atom: as packages but pre-installed nonetheless.
That these features are installed as packages is key to Atom’s design. Atom adopts a modularized architecture as a result, making it easy to configure and adjust the architecture if needed.
This highly configurable setup is mostly thanks to Atom’s deep Node integration. Peek at most of Atom’s pre-installed plugins and you’ll see a basic Node architectural pattern…if you’re a regular Node hacker then adding Atom to your toolkit is close to a no-brainer.
Managing settings in Atom is done using a nice user interface, something that Atom has over Sublime Text (at least I think so). Adding themes, installing/removing packages and creating custom settings is a breeze in Atom.
Again, Atom is in beta at the time of this post but it a version 1.o release is looming. GitHub once said that there would be both free and paid versions of the editor, but it appears that it’s now 100% free!!!.
I’m not yet ready to leave Sublime Text for Atom…I’ve gotten extremely comfortable with Sublime Text over the years and have it setup just how I want it. Keystrokes are memorized, bash scripts are synced up, themes are picked, etc.
But this may change. Will probably go full-on Atom for next project and put to the test.
Jade (now Pug)
RevlonProBrands.com is a responsive/adaptive/insert-another-buzzword-here website, but Sitecore is using server-side code to load in two versions of the page: one for desktops and another for everything else. So it made sense to use some sort of development-level templating system that would apply the common parts to each page.
I chose Jade (now called Pug) for this, a very simple templating engine that compile pages into HTML. In terms of what code you have to write to get things done, Jade is similar to things like LESS and Haml in the sense that indentation defines block structure.
So you use npm to install Pug on your machine. Then create .jade files like this…
doctype html
html
  head
    title kaidez.com
  body
    h1 My Page Header
And with a few keystrokes, this file will output an .html file like this
<!doctype html>
<html<
  <head<
    <title<kaidez.com</title<
  </head<
  <body<
    <h1<My Page Header</h1<
    <p<My Content</p<
  </body<
</html<
I went with Pug because I’ve been playing with the MEAN stack lately and Express (the “E” in MEAN) likes to use Jade. So I figured it made sense for me to figure out.
Pug has “includes” functionality similar to PHP includes and .NET user controls. In other words, small parts of page code can be broken out into their own files and then embedded into other pages for output.
So in other words, these two .pug files…
//index.jade
doctype html
html
  include includes/header //this is an include file
  body
    h1 My Page Header
    p My Content
//includes/header.jade
head
  title kaidez.com
…SHOULD output a single .html file like this…
<!doctype html>
<html>
  <head>
    <title>kaidez.com</title>
  </head>
  <body>
    <h1>My Page Header</h1>
    <p>My Content</p>
  </body>
</html>
The indentation didn’t QUITE work out the way I wanted to when I used a <header> tag…not sure why that was after a doing a web search for an answer. I think I can figure out why this is later on down the line, or maybe just asking for an answer on Stack Overflow will work as well.
That being said, I was approaching the delivery date for submitting the finalized code to the lead engineer, so I couldn’t spend a whole lot of time on this problem. I’ll will try to fix the issue but if it persists and I have to do a similar project in the future, I may just use Jekyll, which has an incredibly straightforward templating system.
OOCSS
As mentioned in my 2013 site redesign post, I really wanted to use object-oriented CSS, or OOCSS, in a project. I chose this project to do so and I am happy with what I accomplished and what learned in the process.
There’s not enough room in this blog post to go through all its characteristics. But, simply put, OOCSS is a CSS design pattern that implements what its name implies: an object-oriented method for writing CSS using some common best practices.
OOCSS is a beautifully crafted set of ideas by Nicole Sullivan. The central ideas include:
- placing styles under CSS classes and not IDs, reserving IDs for JavaScript hooks.
- separating these classes into two formats…one for style and one for structure.
- in true object-oriented style, reusing these classes across your page elements as needed.
- avoid inefficient CSS selectors, such as descendant selectors.
- always linting your CSS to test for bugs and confirm that CSS best practices are being followed.
I applied these ideas to my Pro Brands page code, specifically the individual product image module. Each module contains lots and lots of shared CSS classes among the various page elements it contains. Some of the module elements contain IDs; however, none of these elements have CSS styles applied on the ID level.
OOCSS definitely takes some getting used to and takes more work. Quite a few people have personally told me they disagree with it as a practice and don’t use it. But I have noticed that the CSS parses faster than if I hadn’t used it so I’m not going to give up on it.
Modernizr & yepnope
(Author’s note: Yepnope has sorta/kinda been deprecated (read more about this) so this part of the post is here for historical purposes.)
Sitecore loads one version of the site for desktops and a (slightly) different version of the site handheldz.
Each product image reacts to a jQuery-powered mouseover on desktops and a jQuery-powered click on handhelds. The image reaction is, when one of those events happens, a window scrolls up over it displaying some product info using jQuery.animate().
The group of images is placed in a JS array where a forEach method loops over it, but forEach isn’t supported in legacy Internet Explorer. That meant building a feature-detect for forEach and, if the site loaded into a browser that didn’t support that, loading in a polyfill that would apply forEach support in such browsers.
This whole process was managed by Modernizr and its Modernizr.load() method. And it’s a pretty straightforward process when keeping a few things in mind…
- Note that MDN provides a great piece of polyfill code1…I copied it into a file called
forEachPolyfill.js. - Remember that a full Modernizr build performs features detects for many things by default, but not everything.
- Remember that you can create a custom Modernizr build with only the features-detects you want, and can also create your own custom features-detects for the things that Modernizr doesn’t look for by default…this is done with Modernizr’s sorely under-used
addTest()method. - Note that Modernizr provides a well-stocked list of pre-written feature-detects in its GitHub repo.
1 the polyfill code has been updated since I first used it, but all works well for both versions.
But most importantly, remember that Modernizr has a Modernizr.load() method that’s based on yepnope.js
I applied a custom feature-detect based on one of these pre-written pieces of code: the ECMAScript 5.1 array feature-detects. I then placed the code in a file called forEachTest.js.
There are two versions of app.js: one for desktops and one for mobiles & handhelds. Sitecore uses device detection to decide which one to load.
The .js files look like this:
forEachTest.js
/*
 * Make Modernizr test for "Array.prototype.forEach" so it can work
 * cross-browser when building out the single product modules. When
 * the test passes, "Modernizr.foreach" is attached to the list of
 * Modernizr classes in the <html> tag.
 */
Modernizr.addTest("foreach", function(){
  var forEachFunc = Array.prototype.forEach;
  return typeof forEachFunc === "function"
});

Modernizr.load({
  test: Modernizr.foreach,
  yep: "js/app.js",
  nope: ["forEachPolyfill.js", "app.js"]
});
app.js (Mobile/Handheld Version)
function ScrollContent() {}

/*
 * "buildScrolls" method: runs faster if it's attached to core
 * function's prototype and not inside core function.
 */
ScrollContent.prototype.buildScrolls = function(element) {

  /*
   * scroll up code/down for mobile/handhelds using "jQuery.click()"
   * below since this is the mobile/handheld version. In the desktop
   * version, "jQuery.click()" is replaced by "jQuery.mouseover()".
   */

   // scroll up
  $("#" + element + "Id").click(function() {
    $("#" + element + "Content").animate({
      top: "-=434px"
    }, "fast");
  });

  // scroll down
  $("#" + element + "Content").click(function() {
    $(this).animate({
      top: "+=434px"
    }, "fast");
  });

};

var products = new ScrollContent();
["productOne","productTwo","productThree","productFour","productFive","productSix","productSeven"].forEach(products.buildScrolls);
And the HTML code for each scroll looks somewhat like this…
<div id="productOneId">
  <div id="productOneContent">...</div>
</div>
<div id="productTwoId">
  <div id="productTwoContent">...</div>
</div>
<div id="productThreeId">
  <div id="productThreeContent">...</div>
</div>
<div id="productFourId">
  <div id="productFourContent">...</div>
</div>
<div id="productFiveId">
  <div id="productFiveContent">...</div>
</div>
<div id="productSixId">
  <div id="productSixContent">...</div>
</div>
<div id="productSevenId">
  <div id="productSevenContent">...</div>
</div>
The divs that end in “Id” are buttons that run one of the mouse events while the divs that end in “Content” contain the product images that appear on the mouse events.
So on page-load, everything works as follows…
- Inside
forEachTest.js, Modernizr tests for the existence offorEachin the browser. - If
forEachexists, the “yep” part of the code runs and loadsapp.jsinto the browser. - If
forEachdoes NOT exist, the “nope” part of the code runs and adds both the polyfill code andapp.jsinto the browser. - When one of the divs ending in id receives one of the mouse events, the
ScrollContent.buildScrolls()method inapp.jsruns. ScrollContent.buildScrolls()takes an array of text strings, and each array item in the array is passed as theelementparameter inbuildScrolls().-
The parameters are text strings that get passed to the
elementreference in the jQuery event calls. So for example:- the value of
elementin the forEach loop is “productOne”. - two text strings are built as a result: “#productOneId” and “#productOneContent”.
- both text strings match the name of the div in the HTML code, synchronizing with the jQuery event calls
- the value of
Grunt & Gulp
I can’t see task tools like Grunt being omitted from my workflow and as discussed in my last site redesign post, Grunt ruled my workflow. But Gulp has emerged as formidable challenger to Grunt.
Grunt and Gulp are Node-based task runners that run from the command line. Both let you build custom tasks but there are tons of plugins available for each that let you run pre-built tasks. There are probably more similarities but these are the two that stick out to me the most.
The BIG difference is how Gulp works behind the scenes…Gulp uses Node’s streaming system to build and synchronize its tasks. Gulp creator Eric Schoffstall has said that you need to be a programmer to understand Gulp, but I think that the streaming system makes parts of it easier. Gulp streams allow for the easy chaining of tasks as well as requiring less configuration, and I like that.
I used Gulp and Grunt while coding the Pro Brands site because for all of Gulp’s advantage, there are more plug-ins available for Grunt. So in order to get certain tasks done within a short development timeline, I used Grunt to fill in the spots where a Gulp plugin wasn’t available.
The fact that there are less Gulp plugins that Grunt ones ties into Gulp’s philosophy. Eric Schoffstall outlined this philosophy quite well on the JavaScript Jabber Podcast…give it a listen.
Conclusion
There weren’t REALLY a lot of code challenges for me in this project…a simple one-pager like this doesn’t bring any. But I pushed myself with code a little and played with some new tools. I accomplished what I wanted to and as a developer, that’s enough.